

Wicking garden beds are the ultimate, self watering garden, they water the plants from below, and you can easily build one yourself.
We look at a simple design that shows how to build a DIY wicking garden bed using second hand galvanised iron tanks. Its easy, its cheap and works.
The basic design is for a 50 cm high garden and a 10 cm reservoir. Soil depth will be around 30cm.
So here we have it from the builders …
How to build a DIY wicking garden bed.
- We have put in five wicking beds. We used old galvanised iron water tanks and cut them into rings about 50 cms high using an angle grinder.
- After levelling the ground we put old carpet underlay down to prevent sharp stones from perforating the liner we would put in the tanks.
- After positioning the tank rings we lined them with builders black poly … clamping it around the top with pieces of old poly pipe. This helped keep it in place for the next step.
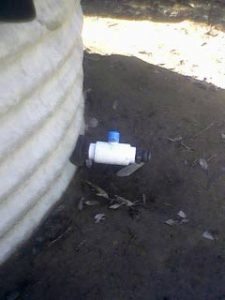
- Plastic plumbing pipe…the sort used for downpipes or agi pipe ..was put in across the base of the tank and up the side to form a means of getting the water into the reservoir.
- The pipe had slits drilled in the part that goes across the bottom of the tank.
- Holes were drilled through the side of each tank just above ground level and we put in taps and carefully sealed around them.
- This was so we could drain the tanks if necessary.
- We then filled each one with 10cm of scoria.
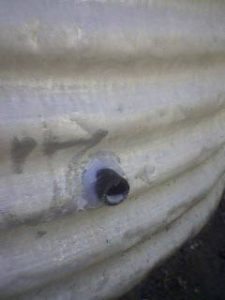
- A small hole with an overflow drainage tube was inserted at the height of the scoria to act as a flood preventative drain.
- The tanks were then filled with water and the scoria levelled.
- A film of geotextile fabric was laid over the scoria and extended about 5cms up the side of the tanks to prevent any soil getting into the scoria.
- We then filled the tanks with soil.


The Wicking Beds are finally finished and they are wicked!!!
These wicking beds are now almost ready for planting. You will need to water the soil first so that the wicking process begins a little more quickly.
Once the process begins, check the soil for moisture regularly to get an idea of how often you need to add water.